Tuesday, May 1, 2012

Much Needed Vacation

April 25th found me leaving my first internship for the LAST time. I had such a fantastic experience at the elementary school. It must be in my blood. I have MANY teachers on my Dad's side of the family and I never thought that I would do well in a school setting due to my low levels of patience. I was surprised to find myself looking forward to seeing my kids everyday and helping/watching them learn and grow. There may be hope for me yet!

April 27th found Chris and I driving away from our apartment for our FIRST EVER solo vacation since our honeymoon. First up on the itinerary: Pittsburgh; home of University of Pittsburgh, and amazing amounts of food. Chris completed his undergrad in Computer Science at Pitt and was very excited to share this part of his life with me. We happened to pick the WORST weekend ever to visit because every building on campus was on lock down due to 100+ bomb threats in the past month. Only students with valid student IDs were allowed in buildings. Bummer! We made due by stuffing our faces with all of his favorite foods :) Our first day we had a beef bulgolgi bowl (beef, veggies, rice), an Uncle Sam's Ultimate Cheesesteak sandwich, a double scoop of ice cream, two types of pizza (Mineo's was better than Aiellos), and no less than THREE pieces of pie at Gullifty's (Fresh Strawberry Cream with a Truffle Layer, Oreo Cheesecake, and Chocolate Mousse). Our last order of business of the day was visiting the Duchesne Lift. The lift is basically a cable car that gets pulled up the mountain over the city. We saw beautiful sights and even braved the cold and wind to visit the platform outside.

 Unfortunately, it was really cold and the flash was startling and bright :)

With many leftovers we began to make our way to our hotel a bit outside of town. We put our trust in GoogleMaps and began snaking our way around the beautiful slums of Pitt. Graffiti, broken windows, and over-grown lawns surrounded us as I began to voice my growing concern over the location of our hotel. Google announced that our hotel was on the left however a glance to the left revealed NO BestWestern but a dark alley with broken down cars. Right now might be a good (yet still inappropriate) time to mention that I had been looking for a bathroom for approximately 2 hours and my plight was becoming rather grim. Super tender mercy, I was not crying or yelling but laughing (nearly hysterically) by this point. After a little bit of re-programming, we found our hotel a little ways down the road and found ourselves safely to our hotel (which was not in a shady part of town). We settled in and watched Catch Me if You Can til 2am. 

Day 2 began with a fantastic hot breakfast and was followed by even more food. We made our way to "The Strip District". The Strip District is a fantastic street market mixed with high-end food stores. Perfect! We spent our morning shopping and ended up with $30 of sample chocolates/cocoa rouge, two scarves, gourmet popcorn (cinnatoast, kettle, cheese/caramel, and chocolate/caramel), dried mango, pizza roll, and baklava. With one quick visit back to Chris's old stomping grounds for a savory breakfast crepe we were on our way to Washington DC. 

DC has been a whirl of games, museums, temple, church, walking, eating, games, walking, eating, games, walking, and a little bit of sleep thrown in. Here are some highlights: 


We went to the International Spy Museum on Monday. We took a GPS guided spy hunting tour. They send you on a fictional spy case that requires you to use their silly GPS to "scan for spy dust" and "scan for fingerprints" and use memorial plaques to crack Russian codes. We had fun goofing off and sneaking around a couple blocks but wouldn't pay to do it again :) Luckily, we did catch our bad guy and we received a top score for our work.  The museum was super cool but unfortunately they don't allow pictures inside :(

We loved seeing the rocks and gems at the Natural History Museum. There was a lot of hype about the Hope Diamond. It was pretty, but I enjoyed some of the other gems much more. This exhibit is A MUST SEE! The museum also has an amazing mammals exhibit with lifelike taxidermy animals. Another favorite. 


Thursday, February 16, 2012

Update

Chris and I have been SUPER SUPER busy since I started the practical part of my program. I spent two semesters working in the Speech and Hearing Clinic at the University. One semester was spent working with children and the other spent working with adults with aphasia. Both semesters presented with their own challenges and things to learn. During my second clinical semester I also picked up a job working as a secretary in the clinic. I got to sit in the office, do my paperwork, and get paid! I am elated to be done with that part of the program because now I get to be in the real world at my internships. 

During the summer Chris and I tried to have some fun when we could between his busy work schedule and my 4-5 days a week at the clinic. Some highlights were the Detroit Science Center and picking apples this fall. We found a little mom and pop orchard that lets you drive your car between the trees and we ended up going 3 different times!


I made it through my first truly traumatic hair experience and had to experience having short hair all summer. It is finally long enough to put into a ponytail without the help of 8 bobby pins!  I am very much looking forward to growing it out.

In October I had to observe in a school setting for my School-Aged Language Disorders class. As I was speaking to the Speech Pathologist I kept feeling these little nudges that what she was saying was what I needed to hear. I was rather taken aback but when the SLP offered to take me on as a student intern. It suddenly hit me that I needed to be there. I instantly began to panic because the deadline for a school internship had passed in MAY! I was MONTHS overdue. I instantly drove over to the supervisor's office and with just a bit of sweet talking and flattery was able to convince her to let me do a school internship!!! It was such an answer to prayer and I could really feel Heavenly Father's hand helping me along this path.

I began my internship at a 4th and 5th grade school in January. I LOVE IT! My supervisor and I are like two peas in a pod. We have so much in common and work very well together. Even though I am faced with some challenging situations, I am reminded how much I love working with those kids everyday. A hug, a success, or a high five make it so worth it! I am trying not to get too attached because I know I probably won't end up working there, but its hard not to see myself there everyday! 

This internship has meant a lifestyle change for both Chris and I. Whereas bedtime used to be between 12 and 1am, I now start to get ready at 9:30. This is particularly difficult because I have night class until 8:30 twice a week. But such is the life of a soon-to-be professional SLP!

Sunday, February 12, 2012

Chocolate Infusion

Tonight I made Pots de Creme. I saw the recipe on Pioneer Woman's Food Network show. I was so surprised at how well it turned out. Its almost as easy as opening the freezer and opening the ice cream and delivers a MUCH better hit of chocolate!  This dessert was gone so fast that I didn't get any pictures!

Here is Pioneer Woman's version with step by step pictures:
Pioneer Woman's Pots de Creme

Pots de Creme
Recipe adapted from Pioneer Woman
Serves: 4
Prep Time: 5 minutes
Total Time: 3 hours

1 cup semi-sweet chocolate chips
1.5 ounces good quality dark chocolate (optional)
2 eggs at room temperature
dash of salt
1-2 teaspoons vanilla
1/2 cup cocoa water
Whipped cream

Put everything but the cocoa water in a blender. A good way to get your eggs to room temperature without leaving them on the counter for an hour is to place them in a bowl of warm water. I used vanilla bean paste for the vanilla but normal extract would work just as well.  Before you begin blending get your cocoa water ready. Boil 1/2 cup water and whisk in 1 Tablespoon of cocoa. This will replace the coffee in the original recipe.

With your chocolate, eggs, salt, and vanilla in the blender and the lid ON, begin blending. Slowly pour in the cocoa water as it blends. This will melt the chocolate and your creme will expand. Blend until smooth and creamy. Pour into your desired containers. I used 2 mason jars to make 2 shared desserts :) Place in the fridge to set for at least 2 hours.

The result is a deliciously rich and thick chocolate creme. Top with whipped cream and enjoy!


Saturday, October 22, 2011

Spiced Apple Cider Muffins

I am on an apple cider kick. I thought we had our fill of apple cider until g-pa and g-ma Lucas gifted us a gallon. Because I don't feel that sitting down with a tall glass of cider is the healthiest of things to do I began thinking of ways I could use it in baking.

First up THIS recipe. Apple cider caramels. After filling our apartment (and probably those sharing vents with us) with tear-wrenching smoke during the first attempt to reduce 2 cups of cider to 1/3 cup, I finally got things right. Well mostly right. Apparently a meat thermometer isn't the best way to measure the temperature of your caramel. It turned out a bit soft. But I think I closer than I would have, had I stuck to my first plan of using our digital human thermometer. It simply assured me that my caramel was "HOT". Lesson learned. The verdict? The caramels are delicious but didn't pack quite the cider punch I was hoping for.

On to the next recipe. When I have a long day at school/clinic I search for recipes, find the most delicious one I can, and tell myself that when I get home I can make it! Most of the time when I get home I am too tired to cook but the thought of cooking gets me through the day. It was on one of those days that I began fixating on Apple Cider Muffins. I hadn't found a recipe that I liked yet but I knew I wanted to make some.

Fast forward a few days and Chris has asked me for about the 5th time when I am going to make the cider muffins. We took ANOTHER trip to a cider mill (our 5th) and picked up more cider. After searching through many many recipes I have settled on this one, an amalgamation of many :)

Spiced Apple Cider Muffins
Yields approx. 14 normal sized muffins

Wet:
1/2 c. applesauce
1 Tbs oil
1 egg
1 tsp vanilla
1 c. of apple cider reduced to 1/4 c.
1 apple diced

Dry:
1 1/2 c. whole wheat flour
3/4 c. sugar
1/2 tsp salt
2 tsp baking powder
1 Tbs (ish) cinnamon
dash nutmeg
dash allspice

 1. Reduce your apple cider. Pour one cup apple cider into a small pan and bring it to a boil. Carefully boil down to 1/4 c. Your house will smell delicious as long as you keep a close eye toward the end and don't turn your apple cider reduction into carbon like I did the first time I tried reducing apple cider! Set aside your 1/4 c of cider reduction to cool.

2. Start your oven warming up to 400 degrees. Mix your dry ingredients.

3. Mix your wet ingredients.

4. Mix your two mixtures together! You don't want them to get over mixed so don't get carried away. You want to mix them until they are just combined. NOT until they are smooth.

5. Bake until a toothpick inserted into the middle of a muffin comes out clean. I wish I had paid closer attention... Maybe 15-17 minutes.

If you want you could brush with melted butter and roll the tops in cinnamon and sugar but I was trying to keep some semblance of healthy. Next time I will add flax to up the fiber content. Enjoy!

Sunday, October 2, 2011

The Mother of All Chocolate Cakes

Tonight my mom and I hosted a girls night during the Priesthood session of General Conference . We had three of our favorite people over for soup, salads, pie crust tasting, and cake. More on the cake to follow. It was so nice to get together with good friends, good food, and good conversation.  I am grateful for the Relief Society that has taught me how to form and value friendships with those who are at different points in their lives than I am. We laughed, ate, told stories, ate, made pie crust, and ate some more. A wonderful close to a wonderful first day of conference!


On to the cake!

A few weeks ago I tried THIS cake. It was absolutely delicious but I don't think that the 3 cubes of butter is worth it for the filling. It was also much more time consuming to make than I have time for! While the cake is VERY delicious, I found myself longing for something more. Enter THIS cake. This chocolate cake has been in our rotation for the past year and is very impressive. Chris and I sometimes make the chocolate whip cream and eat it straight out of the bowl with our fingers dip strawberries in it. While the chocolate whip cream is no more healthy than the 3 cubes of butter filling, I feel the calories are totally worth it. Unfortunately this recipe uses a boxed cake recipe which limits the quality of the cake itself. Even the best boxed cake can't beat a good homemade version.

I have created what I think is THE perfect chocolate cake. I have taken components from the two different cakes and combined them to create cake that is truly droolworthy; cake that makes me swoon; cake that makes my husband love me infinitely more than before (if that were possible :)).

This cake has a foundation of moist rich chocolatey cake, layered with a chocolate whipped cream,  surrounded by chocolate buttercream frosting, and topped with toffee bits & sea salt. Can you tell we really like chocolate in this house?  Judgement is still out on buttercream vs. ganache but I will have to wait for another special occasion to have an excuse to compile this many calories in one place again before we can do the comparison.

Here's the recipe! You have most everything in your pantry already.
You can thank Annie of AnniesEats for the cake and frosting inspiration in this recipe!

Perfect Chocolate Cake v.2.1


For the cake: 

2¼ cups all-purpose flour
2¼ cups sugar
1 cup plus 2 tablespoons unsweetened cocoa powder
2¼ tsp. baking soda
1½ tsp. baking powder
1½ tsp. salt
1/3 cup vegetable oil
1 cup plus 2 tbsp. buttermilk
1 cup plus 2 tbsp. Cocoa water (mix 2T cocoa with 1c. + 2T water)
3 large eggs
1 tbsp. vanilla extract

 
To make the cake, preheat the oven to 350˚ F.  Grease and flour the edges of 3 8-inch baking pans, shaking out the excess.  Line the bottoms with rounds of parchment paper. If you don't have 3 pans use 2 and plan to cut your cakes into 4 layers.  In the bowl of an electric mixer, combine the flour, sugar, cocoa powder, baking soda, baking powder, and salt.  Mix on low speed to blend.  Add the vegetable oil, buttermilk, cocoa water, eggs, and vanilla to the bowl and mix on low speed until well blended and completely incorporated.  Divide the batter evenly between the prepared pans.  Bake 20-25 minutes, or until a toothpick inserted in the center comes out clean.  Let the cakes cool in the pans about 15 minutes, then invert onto a wire rack and allow to cool completely.  Remove the parchment paper.

For the Chocolate Whipped Cream
3 cups Heavy Whipping Cream
1/3-1/2 cup sugar
1/3 cup cocoa powder (more like a 1/2 if you like it dark!)
2 tsp. vanilla extract

Stir all your ingredients together then whip till thick, stiff, and creamy! (approx. 3 minutes)

For the buttercream:
12 oz. chocolate
¼ cup cocoa powder
¼ cup very hot water
1 cup butter
1/3 cup powdered sugar
Pinch of salt
In a heat safe bowl, melt your chocolate (stirring frequently) until it is completely melted and smooth.  Set aside and let cool to room temperature.  In a small bowl, combine the cocoa powder and water and stir until smooth.  Combine the butter, confectioners’ sugar and salt.  Beat on medium-high speed until light and fluffy, about 5 minutes.  With the mixer on low speed, gradually blend in the melted and cooled chocolate until well incorporated.  Blend in the cocoa powder-water mixture until smooth. Smear it all over your face and lick off taste- enjoy!

To assemble your cakes, level layers if needed. Place hearty amounts of the chocolate whipped cream between each layer. Spread a thick layer of the buttercream on top and around the sides until it's pretty and holding as much chocolate as possible:) Top liberally with heath bits and give the edges a light sprinkle with sea salt.

We are counting down the days until we can eat this cake again! Luckily, I saved half of my last piece for secret eatings tomorrow. Which is a good thing because I have a paper to start, write, finish, edit, turn-in tomorrow before noon :) Cake for breakfast? I think so...


Friday, September 16, 2011

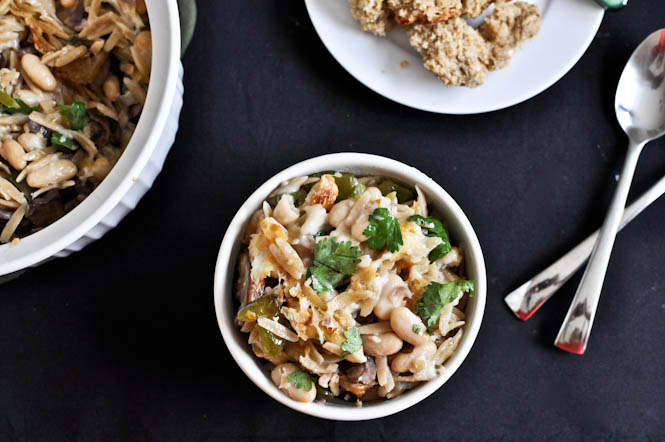
Fancy Orzo Bake

I think what motivated me the most to start blogging again were all the delicious recipes that we try around here. I love cooking and usually end up making 1-2 new dishes a week. Chris is fantastic at trying and critiquing food. Here is our system.

1. When I see a recipe I like I star it in my google reader.
2. When it comes time to make dinner I scroll through my hundreds of starred items and pick one that I happen to have all the ingredients on hand for :)
3. I don one of my many super cute aprons and make a mess in my miniscule kitchen. Seriously. Think of the spot in your kitchen next to your sink. You know that square of counter that's barely big enough for your cooling rack? That's the size of my BIG section of counter.
4. After eating we talk about what we liked or didn't like about the meal. We decide if we would make it again and if we would, what changes we would make.
5. If the recipe is delicious enough to make again it goes in a special recipe file in my OneNote with all our changes included to the side.

This system works fantastically for me. When I have to make dinner for people I go straight to my OneNote for our tried and true recipes.

This latest recipe is being added to OneNote today. I starred the recipe thinking this is WAAAY too fancy for us. We are nowhere near that refined! But it looked yummy so it got a star. I was feeling creative last night and so into my closet, i mean, kitchen I went! The mess making was minimal. With the exception of the spinach I usually have everything in my fridge. Dinner came together in a half hour.

The original recipe calls for olive oil and Parmesan as a topping but if I wanted Chris to eat dinner I knew I had to tamper with that a bit. I solved the problem by making a light cream sauce after the veggies were cooked and before adding the spinach.

Recipe adapted from How Sweet Eats
Fancy Orzo Bake
serves 4+
1 cup orzo pasta
2 tablespoons of olive oil
1/2 sweet onion, chopped
1 red pepper, chopped (original recipe called for green (bleck!) You can use green if you want! )
1 cup of sliced mushrooms
1 T butter
1 T flour
1 c milk ( I used 1%)
3 cloves of garlic, minced
3-4 cups of raw spinach (Chris LOVES spinach so I increased the original 2c.)
1 15-ounce can of white beans, drained and rinsed (I used great northern, cannellini would work too!)
3/4 cup grated parmesan cheese (Not the stuff in a can unless you are desperate!)
1/2 c mozzarella cheese
fresh herbs for garnish, such as cilantro, parsley and basil ( I didn't have fresh so I went with dried basil)
Preheat oven to 375 degrees F.
Prepare your pasta according to the box instructions. Decrease cooking time by 1-2 minutes.
While pasta is cooking, heat a skillet over medium heat and add olive oil. Add onions and peppers and cook for about 3-4 minutes. Add in mushrooms and cook for 3 minutes more, tossing occasionally.
At this point, push your veggies to the side of the pan and add your butter to the naked part of the pan. Make a roux. Melt butter- stir in flour- let cook for a min-whisk in milk. Your veggies will work themselves into the mix as your stir and whisk. Don't worry about them :)
Add in garlic and spinach, and stir until spinach wilts, then turn heat down to low. Add in white beans and your drained mostly cooked pasta. Off the heat and add half your Parmesan. Stir it all up!
If your skillet is oven-safe top with the remaining cheeses and pop it into your oven and let it sit until things are toasty :)
If your skillet is NOT oven safe, spray a baking dish and transfer your pasta mixture. THEN top with cheeses and put in the oven.
Garnish with basil.

You can add chicken if you would like! Rotisserie chicken would be fantastic in this!

Saturday, September 10, 2011

New Henne Happenings

Hello. Long time no talk. Sorry about that. I was busy. A FEW things have happened since we last chatted. Ready for a list? I love lists.
1. 13 months ago I did this little thing called GETTING MARRIED. It was wonderful, fantastic, stressful, delicious, fun, and beautiful. Basically everything I ever dreamed of. Minus the stress :) Hopefully I will get around to blogging about that in the future! Here are a few pictures in the meantime.


2. I now have a new last name (Henne) and this blog MAY have a new part time author. Meet my hubby Chris!


3. We moved into our little apartment in the ghettos of Ypsilanti. Our first few weeks were very interesting. I woke up with every siren, flash of light, or thump. Now, after a year in our apartment, I sleep through most of the unsettling noises :)
4. Chris began his job as a Software Developer in Ann Arbor. He loves his job. He works with fantastic people and his company is flexible enough to let him work from home (or my parents home!) whenever he wants. This means we get to spend long weekends with our families who live an hour away.
5. I started my Speech Language Graduate Program! I am 1 year into the program and will graduate in T-minus 11 months! I am in my last clinical semester with two medial internships ahead of me. I have decided not to do a school internship with the hopes of finding something I love in another area of SLP. Things in my new program are great and my classes are easy for the most part.
6. Chris and I became Temple workers at the Detroit Temple. We work with my parents and it has been such a fulfilling experience for both of us! Our marriage is blessed because of our time spent in the temple. We always leave happy!
7. No animals or children yet but I am anxious to get kitties once we move into a place that won't charge an extra $1500 a year per pet. I am also thinking about fostering Greyhounds. The children will have to wait until I am not spending every minute of my day in the speech clinic!